Crossing the Titan’s Garden

The exploration pillar is a large part of Level Up; Advanced 5th Edition. Important to this third of the game are our new journey rules. In this article, we’re going to walk you through a journey.
Our Heroes
The adventurers are a group of four, all 7th level: a wizard, a ranger, a cleric, and a rogue. For encounter building purposes, their total character level is 28. The rules tell us that an easy encounter for this group has a total CR of 4 or less, a medium encounter will have a total CR of about 9, and a hard encounter will be about CR 14. In addition to those total CRs, the maximum single monster CR should be 10, otherwise an encounter may prove near impossible.

Region
The core rules contain 17 Regions, which are templates for areas you might find in your world. In the game, ‘Region’ is a specifically defined game term. Regions include Feywood, Flowing River, Parched Sands, Unrelenting Marsh, and so on.
Additionally, each Region can be of any tier, which corresponds to the game’s tiers of adventure —a tier 0 feywood might be home to some mischievous satyrs and wildlife, while a tier 4 feywood might be the dangerous realms of a capricious archfey. That makes for a total of 85 potential Regions. (We also provide guidelines for creating your own Regions, too, and we bet fans and other publishers will find Regions to be a fertile space for their own content!)
Our journey is a simple one which encompasses only one Region — on our world map it’s a large forest, locally called the Titan’s Garden, which we’ve noted is a tier 2 Tangled Forest.
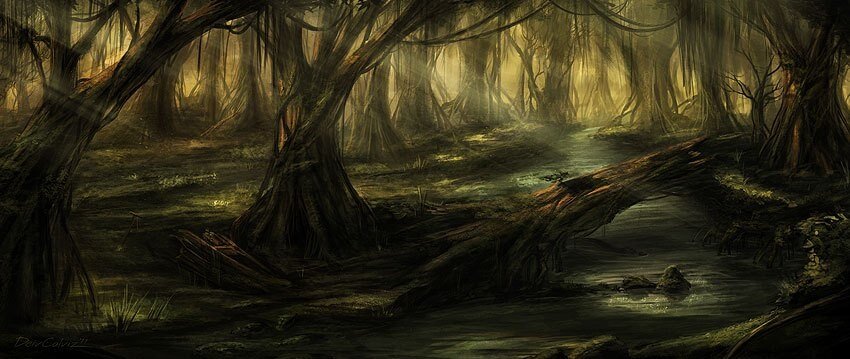
The Narrator quickly determines some details about the Region being traversed. We’ve already established that the Titan’s Garden is a tier 2 Tangled Forest. That has the following properties:
Terrains. Forest, jungle, mountains, ruins, settlement, subterranean, swamp, temple, tomb.
Tiers. Tangled Forests often range from tier 1 through tier 4. At tier 1, a Tangled Forest might be the forest home of a band of outlaws or bandits, while higher tiers might feature dinosaurs, dragons, giant insects, and ancient traps.
Weather. 1–6 clear, 7–14 mist, 15–20 rain, 21-25 snow.
Natural Camouflage. Adventurers gain an expertise die on Stealth checks.
Heavy Undergrowth. Ranged attacks beyond 15 feet are made with disadvantage.
Journey Activities. When making a check to Harvest or to Hunt and Gather, an adventurer rolls with advantage.
The Narrator rolls for the weather, and gets a 10 on a d20. In the winter they would add 5 to this roll unless the Region is in a notably warm or tropical clime, but it’s Spring, so we keep the 10. Mist it is! It’s up to the Narrator how often they make this weather roll; we suggest just once per region, unless the region is particularly large. These weather entries are mainly descriptive — major events like thunderstorms, tornadoes, and so on are types of exploration challenge.
Travel Pace
The adventurers determine their route. At this stage of the planning, they need to select a travel pace (Crawl, Slow/Wagon, Normal, Fast/Mounted, and Gallop). Each travel pace comes with advantages or disadvantages, but our party is choosing a Normal travel pace, which is 3 miles per hour or 24 miles in a day’s travel. At this pace, they are unable to use Stealth, but they are not worried about that right now.
The Titan’s Garden is 100 miles across. That’s just over 4 days’ travel at Normal pace. The adventurers set off!
Resting & Supply
Level Up uses a simple, abstract supply mechanic called — surprisingly — Supply. Supply consists of food, water, and other consumables. 1 Supply feeds a small or medium creature for one day, and typically costs 5 silver, although you can try to hunt Supply for free, or spend more on fine venison and elven wines if you wish.
On a 4 day journey, there’s not much chance of starvation. Each time an adventurer takes a long rest, they need to consume 1 Supply. That means the party of 4 adventurers needs a total of 16 Supply for this 4-day journey. They might gain some more on the way (spoiler: they will!), or they might lose some in an exploration challenge (spoiler: they won’t!), but between them they can carry 16 Supply easily. They stock up on 20 Supply before they depart, carrying 5 Supply each.
If they run out of Supply for some reason, they will gain a level of fatigue whenever they take a long rest without consuming a Supply.
Yep, you guessed it! In Level Up it’s much harder to simply magic up food. And you can’t store it in extra-dimensional spaces, either, as it spoils.
Journey Activities
Each PC can undertake a journey activity from a list of 14 options. The Region details tell us that Harvest, and also Hunt and Gather, both gain advantage in this area. Plant and animal life are abundant!
The wizard chooses to Chronicle, making notes and maps as they go. The ranger chooses to Hunt and Gather, providing the party with extra Supply. The cleric opts to Pray, and the rogue decides to Scout.
The Narrator knows that the usual DC for a tier 2 Region is 14. There are no special modifiers this time, so each adventurer makes a DC 14 skill check.
The wizard rolls Intelligence (History) to Chronicle and gets a success. They get an expertise die on future Survival or History checks in this Region.
The ranger makes a Wisdom (Survival) check with advantage to Hunt and Gather and also succeeds. That gets the party 1 Supply for each day the ranger hunts for, which comes to 4 extra Supply. The adventurers will eat well!
The cleric Prays to their deity making a Wisdom (Religion) check. This roll is a critical success! Not only does the cleric get a blessing in the form of an expertise die on their next ability check, but they also get a Boon or Discovery. More on that in a second!
Finally, the rogue makes a Wisdom (Perception) check to Scout. Unfortunately, he rolls a 1 which is a critical failure. Not only does he gain no benefit, he also suffers a level of fatigue due to random minor injuries. He probably sprained an ankle when he fell out of that tree!
Boons & Discoveries
When the cleric got a critical success, they also gained a Boon or Discovery. There’s a table for each tier (5 tables in total), so the Narrator rolls 1d100 on the tier 2 Boons and Discoveries table. The result is the discovery of a blessed cave which can act as a haven should the party need to recover fatigue or strife. That’s good news for the rogue!
A haven — which we’ve mentioned a few times before — is a location where you can take a long rest, sheltered from the elements, without (reasonable) fear of attack or danger. An inn is usually a haven; a campsite usually is not, although there are some class features which can create temporary havens. You can take a long rest anywhere, but if you want to recover fatigue or strife, it must be at a haven.
Encounter Tables
Now the journey is underway. We know it’s a 4-day trek, we know what each adventurer is doing, and we know they have enough Supply (hopefully nothing will happen to that…)
Now all we need to know is what happens on the journey!
The Narrator flips open the tier 2 Tangled Forest exploration table. As we mentioned earlier, 17 regions with five tiers each means there are 85 of these tables!
Table: Tangled Forest Exploring Tier 2 (d100)
1–3 Acid field (exploration challenge)
4–6 Alchemist (monster)
7–9 Boggard sovereign (monster)
10–13 Travel scenery
14–15 Champion (monster)
16–17 Diplodocus (monster)
18–22 Cursed temple (exploration challenge)
23–25 Giant ape (monster)
26–28 Guardian naga (monster)
29–33 Dense fog (exploration challenge)
34–35 Mage (monster)
36–37 Medusa (monster)
38–40 Enchanted statue (exploration challenge)
41–42 Necromancer (mage variant) (monster)
43–45 Owlbear recluse (elite) (monster)
46–48 Flash flood (exploration challenge)
49–52 Shambling mound (monster)
53–56 Treant (monster)
57–60 Flimsy rope bridge (exploration challenge)
61–63 Triceratops (monster)
64–66 Troll (monster)
67–68 Lethal outgassing (exploration challenge)
69–71 Tyrannosaurus rex (monster)
72–74 Lizardfolk chosen one (monster)
75–76 Wood elf sharpshooter (strider variant) (monster)
77–79 Marsh gas (exploration challenge)
80–82 Poison darts (exploration challenge)
83–85 Wyvern (monster)
86–88 Young green dragon (monster)
89–91 Rot grubs (exploration challenge)
92–94 Voracious pests (exploration challenge)
95–99 Social encounter
100 Cursed Waterway (exploration challenge)
It’s a 4 day journey, and the Narrator decides that the party will have 2 encounters. The first is a roll of 07 (boggard) and the second is a roll of 22 (cursed temple).

Boggard
The Narrator flips to the boggard entry in the Monstrous Menagerie. Here’s where the beauty of the new monster tools comes in!
First, we need to determine the exact encounter. We look at the Boggard Encounters table in the boggard entry, and based on the CR 5-10 encounter range we are aiming for we get:
Boggard sovereign with 1d10 + 4 boggards.
We roll 8 boggards plus the sovereign, which is a total CR of 5. A fairly easy encounter for this party.
We even have an entry listing its treasure:
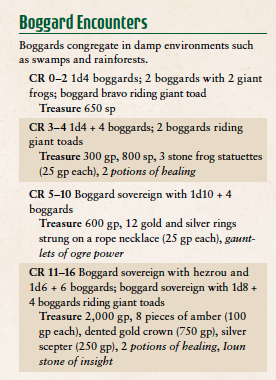
600 gp, 12 gold and silver rings strung on a rope necklace (25 gp each), gauntlets of ogre power.
Of course we don’t have to use that treasure list; it’s a sample for ease of use, but we can always roll randomly for treasure based on the encounter CR. We’re going to stick with the sample treasure list though.
The Monstrous Menagerie helps us even more than that though! We roll on the Signs table and get:
A menhir carved with images of frog-headed demons.
That will get the adventurers talking! Monster signs are a great way to enrich an encounter and heighten anticipation.
Now we want to know what this boggard sovereign and his retinue is doing. We roll on the Behavior table. We get this:
Returning to their camp with a recently captured prisoner.
The details of this encounter are quickly fleshing themselves out. The Narrator realizes that we need a name for the boggard sovereign — so we use the Boggard Names list in the monster entry. We’ll go with Guworka. King Guworka.
That’s everything we need for a boggard encounter! The Narrator initiates it by describing the frog-demon inscribed menhir. The adventurers roll on the Legends and Lore table (in this case, History or Nature checks are required) and with a roll of 15 they learn the following:
DC 10 Boggards are arrogant humanoids constantly seeking to expand their territory. Like the frogs they resemble, boggards can jump incredible distances.
DC 15 Bribes or flattery can sometimes appease a boggard leader.
There’s more information they might have known had they rolled higher, but that information should prove useful.

Cursed Temple
The other encounter in this journey is an exploration challenge. There are dozens of exploration challenges in the core rules, ranging from tier 0 all the way up to tier 4. Here is the Cursed Temple entry. Exploration challenges are intended to be very freeform, which is why the book suggests some solutions but encourages and rewards imagination and clever ideas from the players, or the expenditure of resources such as spells or consumable gear.
You’ll see there are two DCs listed. Individual checks use the first DC, and group checks use the second.
You’ll also see that the challenge has a Challenge rating (6) and XP value. If the Narrator wished, it could be combined with a monster encounter. It basically counts as an extra CR 6 monster if you do this.
Cursed Temple
2nd tier (supernatural)
Challenge 6 (2,300 XP); DC 16/14
Area Immediate (less than 1 hour)
A circle of standing stones was constructed eons ago to worship a dark god and its evil still permeates the surrounding lands. At night bats can be heard—but never seen—flapping overhead. A nagging dread pervades the area, and those with access to divine magic receive a premonition that great evil will spread if this curse is not lifted.
Bones. A Medicine or Survival check finds the bones of several small animals scattered around the stones. Removing or burying these bones grants advantage on further checks against this exploration challenge.
Dreaded Curse. Attack rolls and saving throws made within a 600-foot radius of the standing stones have disadvantage. Anyone under the effects of protection from evil and good is immune to the Dreaded Curse.
Possible Solutions
A Religion check and a ritual performed for a good-aligned god permanently breaks the curse, as does a casting of the hallow spell. Alternatively, an Athletics check can topple the standing stones, breaking the circle and ending the curse—though not without a greater cost than some physical effort and sweat. Each adventurer within 100 feet of the stones makes a Constitution saving throw, taking 21 (6d6) force damage and suffering one level of fatigue on a failure.
Critical Failure: The cursed area expands and becomes more aggressive, dragging down the very limbs of travelers. While within 3 miles of the standings stones, every mile traveled requires 4 miles worth of travel time. The party discovers that 5 (1d6+2) Supply from each adventurer has spoiled, and everyone suffers one level of strife.
Failure: When they leave the area, the party discovers that 4 (1d4+2) Supply from each adventurer has spoiled.
Success: The curse is lifted, rendering the circle of standing stones creepy but harmless.
Critical Success: The adventurers receive a divine blessing, granting them an item or discovery relevant to their quest. Roll once on the Tier 2 Boons and Discoveries table.
You can simply ignore many exploration challenges. Each has an Area entry, so you can easily tell how long it would take to simply backtrack or go around it. If you do that, of course, you get no XP.
If you succeed in the challenge, you get the XP listed. If you fail, not only do you not get XP, but you also suffer other setbacks. In this case, Supply may spoil, and in the case of a critical failure, the entire party suffers a level of strife!
At CR 6, this is an easy to medium encounter for our 7th level party. Let’s assume that the party succeeded in ending this curse by undertaking a group Religion check to perform a ritual. They gain 2,300 XP and continue on their way.
Journey’s End
After 4 days, the party’s journey is over. They consumed 16 Supply, and have 8 left (including the extra 4 the ranger hunted). The rogue would have a level of fatigue due to his botched attempt at scouting, but the cleric’s discovery of a blessed cave granted the party a haven where the rogue was able to recover. They arrive at their destination healthy, and 2,300 XP richer (plus whatever treasure they looted from the boggards, assuming they fought them).
And that’s a simple journey. Journeys can be as short as a day or they can last weeks, covering multiple different Regions!
Get Notified
Don’t forget, the Kickstarter launches on October 5th. Click the button below to get notified when it launches!
An earlier version of this article referred to the Region as ‘Deep Jungle’. The name of this Region ended as Tangled Forest in the core rulebook, and this article has been updated to match it.