How To Make A Monster Encounter
Level Up: Advanced 5th Edition provides you with a whole range of tools designed to make running a monster encounter easy for the Narrator. In this short article, we take a look at the tools which help you create that encounter on-the-fly, with little effort, and show you how the game does a bunch of the work for you! You’ll very quickly establish the monsters, signs of their presence, their behavior, any treasure they’re carrying, and more, so you can run the encounter from the very first hint up to the loot division.

Region Tables
Level Up treats different area types as ‘regions’—a region might be a Feywood, Lofty Mountains, or Parched Sands. We’re going to turn to the Haunted Lands region type as our adventurers journey through a sinister domain. This particular region is a Tier 2 Haunted Lands (each of the 17 region types also have five tiers corresponding to the five adventuring tiers of play, which means there are nearly 100 random encounter tables in Trials & Treasures!)
The table is a d100 roll. We roll 39—ghouls!
Monster Entry
We now know we’re dealing with ghouls, so we turn to the ghouls entry in the Monstrous Menagerie. This is where the monster book’s tools get to shine.
First, let’s figure out the exact nature of the encounter. We know it’s ghouls, but the book gives us more information than that! We look at the Ghoul Encounters table in the ghoul entry, which lists various encounters depending on the Challenge Rating we need. We need a CR 6 encounter which the book tells us is:
2 ghasts with 1d4 + 2 ghouls; 1d6 + 4 ghouls; ghost or wight with 2 or 3 ghasts; 2 lacedon ghasts with 1d4 + 2 lacedon ghouls
To kept simple, we’ll stick with 1d4 + 4 ghouls, but the encounter table does allow you to draft in wights and ghosts if needed!

The same table also tells us what treasure will result from this encounter, giving us a pre-generated treasure parcel we can use as-is. Of course, we don’t have to use that treasure parcel—Level Up has random treasure tables too, of course. But we’ll go with the provided example:
500 gp, 1,000 sp, gold bracelet (250 gp), +1 warhammer (named Whisper, made of silver-runed black stone; once per day, its wielder can cast the silence spell as an action, centered on the hammer), ring of water walking
What Are They Doing?
Now it’s time to use two more useful tables, also right there in the ghoul entry. These will tell us what the ghoul are doing, and also what signs the adventurers come across before running into them. Not every encounter involves simply turning a corner and bumping into a monster!
Let’s start with signs. We roll on the Signs table next to the ghoul, and we get:

A torn and bloody hat or other article of clothing. DC 13 Perception check: marks on the floor suggest a body was dragged away
Sinister! So that’s the first thing the adventures will stumble across. This should make them pause, check the area, and wonder aloud what they are about to encounter, nicely building some tension or anticipation.
When they do encounter the ghouls, we need to determine their behavior. Again, a quick roll on the Ghoul Behavior table, we get:
Squabbling among a pile of bones and discarded items
Well, they are ghouls, after all!
Legends & Lore
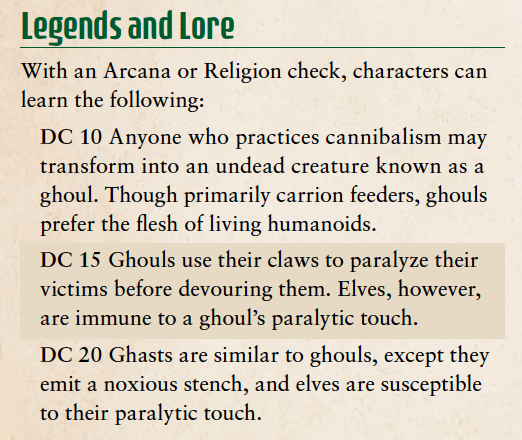
At some point, the adventurers will want to know more about these creatures. Maybe when they run across the signs, or maybe not until they actually meet the ghouls. But when they do, they can roll on the Legends & Lore table. Every monster in the Monstrous Menagerie has one.
For the ghouls, the table tells us the heroes can make an Arcana or Religion check. Based on the result of their check, they recall different amounts of lore about ghouls.
Combat!
So we’re ready to run the encounter. The adventurers have stumbled across the bloody hat, exchanged what lore they know about ghouls, and found the monsters squabbling over a pile of bones. But how does the combat itself play out? Every monster in the Monstrous Menagerie has a short Combat entry which helps the Narrator run that monster. For ghouls, it’s fairly simple at reads as follows:
Ghouls rarely attack when they are outnumbered. They prefer to swarm their enemies, with at least two ghouls attacking one target, preferably an unarmored non-elf. They retreat if they take radiant damage but try to drag paralyzed victims with them.
That information can be used to run the ghouls; for more complex monsters, more specific advice is included.
In Summary
To run this encounter we used various tools.
Wanted Lands Region Encounters
Ghoul Encounters (with treasure)
Ghoul Signs
Ghoul Behavior
Legends and Lore
Combat
Each of these is super-quick to use, and it’s all presented within the ghoul entry itself in the Monstrous Menagerie. Want to see more? You can download the ghoul section of the book below in PDF format and take a look for yourself!